Distributed development as a team
Overview
Next Design allows teams to perform distributed development by splitting models and profiles into files.
The following describes how to operate the following Next Design functions.
| Next Design Features | Overview |
|---|---|
| Splitting and integrating model files | By splitting the model in the project into multiple model files, teams can develop in parallel. |
| Export/Import of Model File | By exporting the divided model file and importing it into another project, some models can be diverted to another project. |
| Reference to Model File | By registering the divided model file as a reference in another project, you can share and edit the model file with other projects. |
| Partial loading of model files | By switching between automatic and manual loading for each divided model file, unnecessary loading of model files is prevented and the loading time of large-scale projects is shortened. |
| Splitting and integrating profiles | By splitting a profile from a project, you can manage the model and profile separately. |
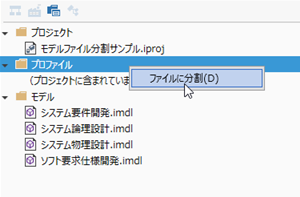
Split/integrate model files
Split into model files
To split the model in your project into multiple model files, do the following:
Operation procedure
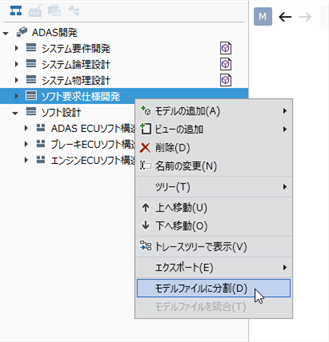
- In the Model Navigator, select the model you want to split into model files.
- Perform the split into model files in one of the following ways:
- From the ribbon, click Team Collaboration> File> Split into Model Files.
- Click Split into Model Files from the context menu.
- If you want to split only one model into a model file, specify the file name in the [Split into Model Files] dialog and click the [OK] button. (If you select multiple models and divide them into model files, you cannot change the file name.)
- When divided into model files, the model will have an icon representing the model file. It is then stored as an imdl file in the Models subfolder in the same folder as the project file.
note
- Only models with the Allow model file splitting checkbox checked in the metamodel can be split into model files.
- If the Split into Model Files menu is disabled, check the metamodel definition for that model.
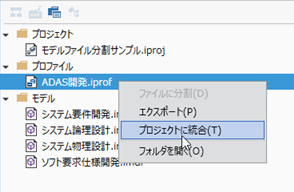
Integrate split model files
To integrate the split model files into your project, do the following:
Operation procedure
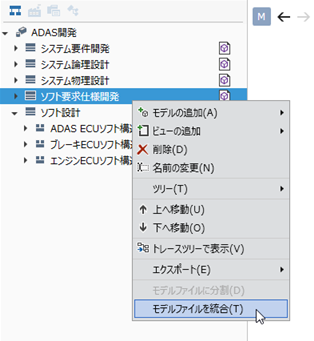
- In the model navigator or project navigator, select the divided model file.
- Perform model file integration in one of the following ways:
- From the ribbon, click Team Collaboration> File> Integrate Model Files.
- Click Integrate Model Files from the context menu.
- Confirm the message in the confirmation dialog and click the [OK] button.
- When the model file is integrated into the project, the icon representing the model file disappears from the model.
Export/import model file
Export the model file
To export a split model file from your project, do the following:

Operation procedure
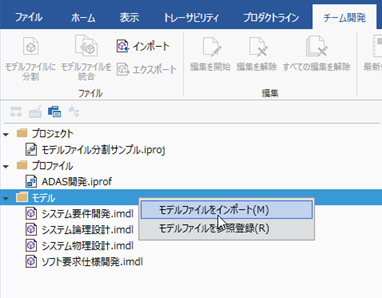
- Switch to Project Navigator with the selector at the top of the navigator.
- In the project navigator, select the model file you want to export.
- Export the model file in one of the following ways:
- Click Team Collaboration> File> Export from the ribbon.
- Click Export Model File from the context menu.
- Select the export destination folder and click the [Save] button.
- The split model file will be exported and stored in the selected folder.
note
- To import the exported model file into another project, the profiles must be the same.
- For details on exporting/importing profiles, refer to the following contents.
Import the model file
To import a model file exported from another project, follow the steps below.
Operation procedure
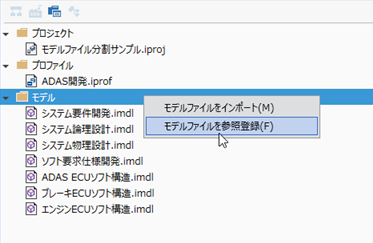
- Open the project you want to import to.
- Switch to Project Navigator with the selector at the top of the navigator.
- Select Model, which is displayed at the top level of the tree.
- Perform the model file import in one of the following ways:
- Click Team Collaboration> File> Import from the ribbon.
- From the context menu, click Import Model File.
- Confirm the message in the confirmation dialog and click the [OK] button.
- In the Import Model File dialog, select the model file (.imdl) and press the Open button.
- When the model file is imported, the model file is added to the Models subfolder in the same folder as the project file, and the model file is also added to the project navigator and model navigator.
info
- The file save format must be the same for the import destination project and the model file to be imported.
warning
- The profile of the project to be imported must be the same as (or include) the profile that created the model file to be imported.
- For information on importing profiles, see:
Reference to Model File
Register the model file of another project as a reference
To share and edit the divided model file with other projects, refer to and register the model file in the following procedure.
Operation procedure
- Open the project to be referenced and registered.
- Switch to Project Navigator with the selector at the top of the navigator.
- Select Model, which is displayed at the top level of the tree.
- From the context menu, click Reference to Model File.
- In the Reference to Model File dialog, select the model file (.imdl) and press the Open button.
- When the model file is registered as a reference, the model file is added to the project navigator and the model navigator.
info
- The file save format must be the same for the project to be registered as a reference and the model file to be registered as a reference.
warning
- The profile of the project to be referenced must be the same (or included) as the profile that created the model file to be referenced.
- For information on importing profiles, see:
Partial load of model file
Set model file to manual load
To set the model file to manual loading, do the following:
Operation procedure
- Select the model file to switch to manual loading in the project navigator.
- Select Set Load> Set to Manual Load from the context menu.
- An icon representing manual loading appears to the right of the model file node.
- The model file will not be loaded automatically the next time the project is opened.
Return model file to autoload
To return the model file to autoloading, do the following:
Operation procedure
- Select the model file to switch to automatic loading in the project navigator.
- Select Load Settings> Revert to Autoload from the context menu.
- The icon for manual loading disappears from the right of the model file node.
- The model file will be loaded automatically from the next project opening.
Load the model file set to manual load
When you open the project, the model file set for manual loading will be unloaded. To manually load an unloaded model file, do the following:
Operation procedure
- Select the model file to manually load in the project navigator.
- Select Load Model File from the context menu.
- The model file is loaded.
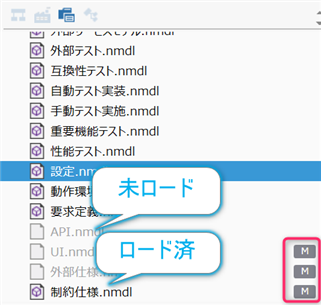
tip
- Model files set to manual nodes will display an "M" icon in the project navigator.
- For unloaded model files, the model file name is grayed out in the project navigator.
reference
- For more information on partial loading of model files, see:
Profile splitting/integration
Split profile from project
To split the profile into files, do the following:
Operation procedure
- Switch to Project Navigator with the selector at the top of the navigator.
- Select Profile, which is displayed at the top level of the tree.
- Click Devide into File from the context menu.
- When the profile is split into files, it is stored as a .nprof or .iprof file in the Profile subfolder in the same folder as the project file.
warning
- Do not replace the profile divided into files (.nprof or .iprof file) with the profile edited in another project.
- When reflecting the profile of another project, please import the profile according to the following contents.
Integrate profiles split from the project
To integrate the profile into your project, do the following:
Operation procedure
- Switch to Project Navigator with the selector at the top of the navigator.
- Select the profile that is divided into files.
- Click Integrate into Project File from the context menu.
- When the profile is integrated into the project, the .nprof or .iprof files in the Profile subfolder are also deleted.