Linkage with SCM system
Overview
Next Design works with Subversion, a configuration management system, to complete a series of file operations on the configuration management repository with UI operations on Next Design.
The following describes the operation of Next Design in cooperation with the Configuration Management repository in the following order.
- Get the project from the repository and open it
- Get edit permission and start editing
- Release edit permission
- Get the latest from the repository
- Undo and undo changes
- Commit your changes and update the repository
- View the commit log
- Register the project in the repository
- Manage the repository used
note
- Prepare the configuration management repository to be linked with Next Design in advance.
Get the project from the repository and open it
To retrieve and open a project from the repository, follow these steps from the Next Design start page:
Operation procedure
- Click Start> Get from Repository and Open ... to display the Repository Selection dialog.
- Select the repository where the project is stored by one of the following methods and click the [Next] button.
- If you are using the configuration management repository for the first time in Next Design, or if the configuration management repository in which the project is stored has not been registered, register the repository using the following procedure.
(1) Select [Register a new Configuration Management Repository] and click the [Next] button.
(2) Enter the connection information to the configuration management repository and click the [Next] button. - If the configuration management repository containing the project has already been registered, select that repository and click the [Next] button.
- If you are using the configuration management repository for the first time in Next Design, or if the configuration management repository in which the project is stored has not been registered, register the repository using the following procedure.
- Select the project file you want to retrieve using one of the following methods:
- Select a project from the project list displayed on the [Select Project File] tab.
- Switch to the Select from Folder tab and select the folder containing the project file (.iproj) from the folder tree that appears.
- Specify the folder where you want to retrieve the project files in [Check out to], and click [Check out].
- If the project file is successfully obtained, the project file will be opened.
Attention
- Specify an empty new folder for the acquisition destination folder.
Get edit permission and start editing
To get edit permission and start editing, follow these steps:
Operation procedure
- Select the project or model file you want to edit using one of the following methods.
- Select the file in the project navigator.
- Select a project or model in the Model Navigator.
- Start editing in one of the following ways:
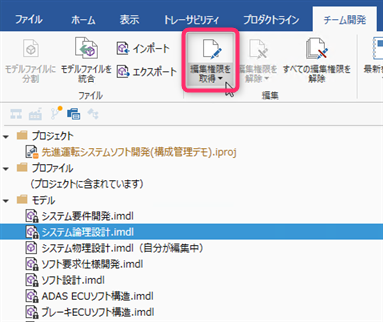
- From the ribbon, click Team Collaboration> Edit> Get edit permission/Get Edit Permission below Selected Model/Get all edit permission.
- Click Get edit permission from the context menu.
- When you start editing, the model file icon will switch and the model file will be marked with [(I am editing)] in the project navigator.
Release edit permission
To remove the edit permission, follow the steps below.
To release the edit permission of the specified file
Operation procedure
- Select the project or model file for which you want to release edit permission by one of the following methods.
- Select the project or model in the edited state in the model navigator.
- Select the file in the edited state in the project navigator.
- Select the file in the edited state in the Configuration Management Navigator.
- Unedit using one of the following methods.
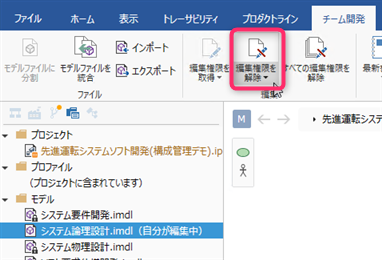
- From the ribbon, click Team Collaboration> Edit> Release edit permission/Release Edit Permission below Selected Model.
- Click Release edit permission from the context menu.
To release edit permission for all files at once
Operation procedure
- From the ribbon, click Team Collaboration> Edit> Release All Edit Permission.
Attention
- If you remove the edit permission without committing the changes from the Configuration Management Navigator, the changed files will remain and will be inconsistent with the repository.
- To align with the repository, undo your changes by following "Undo and Undo Changes" below.
Get the latest from the repository
To update a previously retrieved file from the repository to the latest revision, do the following:

If you want to check if it was updated after getting it before
Operation procedure
- From the ribbon, click Team Collaboration> Sync Repository> Get the Latest, click ▼, and then click Check for updates.
If you want to update all files to the latest revision
Operation procedure
- Update to the latest revision using one of the following methods.
- From the ribbon, click the [Team Collaboration]> [Sync Repository]> [Get the Latest] icon.
- From the ribbon, click [▼] at the bottom of [Team Collaboration]> [Sync Repository]> [Get the Latest], and then click [Get All Files].
To update the specified file to the latest revision
Operation procedure
- Select the project or model file you want to update to the latest revision using one of the following methods.
- Select a project or model in the Model Navigator.
- Select the model file in the project navigator.
- Update to the latest revision using one of the following methods.
- From the ribbon, click Team Collaboration> Sync Repository> Get the Latest, click ▼, and then click Update Selected File Only.
- Click Get the latest version of selected File from the context menu.
note
- Files that have been acquired and changed are ignored, and other files are updated to the latest revision.
Undo and undo changes
To undo changes to an uncommitted file and revert to the original revision, do the following:
To undo changes in all files
Operation procedure
- Switch the navigator to the configuration management navigator.
- Click Revert All from the Commit Target context menu.
- When the dialog confirming the reloading of the project is displayed, click the [Yes] button.
To undo changes to a specified file
Operation procedure
- Switch the navigator to the configuration management navigator.
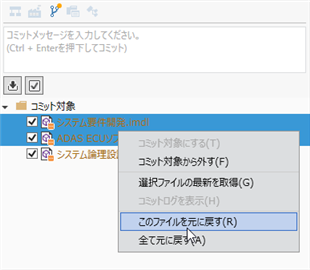
- From the Commit Target in the Configuration Management navigator, select the file for which you want to undo your changes.
- Click Revert This File from the context menu.
- When the confirmation dialog for reloading the project is displayed, click the [Yes] button.
Attention
- The file to which the changes have been undone has been deprived of edit permission.
- If you want to continue editing, obtain editing authority again and start editing.
- Commitd changes cannot be undone on Next Design.
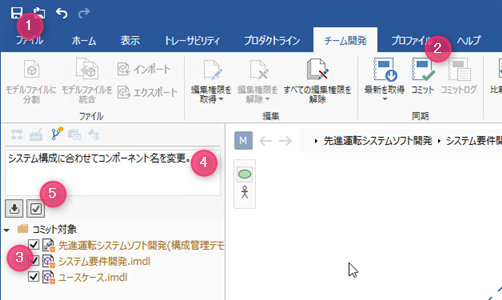
Commit your changes to update the repository
To commit changes to a file and update the repository, do the following:
Operation procedure
- Save the modified file.
- Switch to the Configuration Management Navigator in one of the following ways:
- From the ribbon, click Team Collaboration> Sync Repository> Commit.
- Click SCM Navigator from the selector at the top of the navigator.
- Check the files listed under Commit Target. By default, all modified files are checked for commit. If you want to exclude some files from the commit target, uncheck it.
- Enter the commit message.
- After entering the commit message, click the [Commit] button below the input field, or press the ctrl + enter key.
- This will update the files in the repository and add the commit log.
tip
- If there are uncommitted files after modification and saving, the icon in the Configuration Management Navigator will be marked.

- The icon for uncommitted files is marked with a change.

tip
- Check the Keep editable state checkbox at the bottom of Commit Target and then commit to allow each file to continue editing with edit permission.
- By default, it is unchecked and edit permissions are removed as soon as you commit.
Attention
- It will not appear in Commit Target until you save the modified file.
- Save and then perform the commit operation.
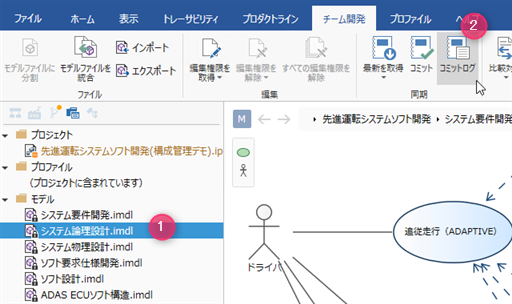
View commit log
To view the commit log for a file, do the following:
Operation procedure
- Select the project or model file for which you want to view the commit log in one of the following ways:
- Select the file in the project navigator.
- Select a project or model in the Model Navigator.
- Select a file in the Configuration Management Navigator.
- View the commit log in one of the following ways:
- From the ribbon, click Team Collaboration> Sync Repository> Commit Log.
- Click Show commit log from the context menu.
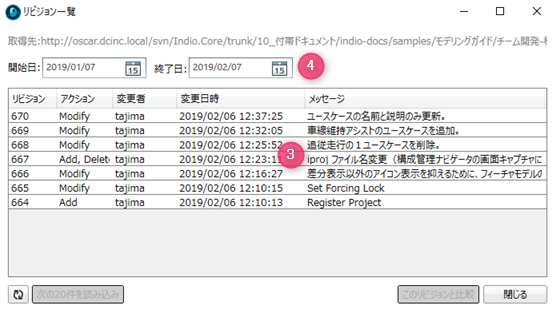
- The Log Messages dialog is displayed, listing the commit logs for each revision.
- The list of commit logs can be narrowed down by specifying the start date and end date.
Register the project in the repository
To newly register a project that has not been registered in the repository in the repository, follow the procedure below.
Operation procedure
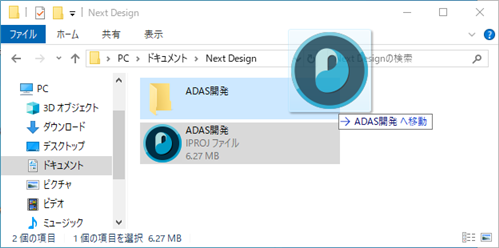
- Create a folder with the same name as the folder added to the repository and move the project files and other sets.
- Open the project file in Next Design.
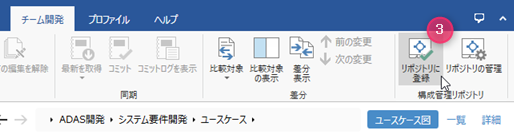
- From the ribbon, click Team Collaboration> SCM Repository> Registration to Repository.
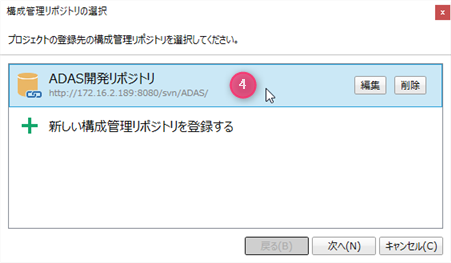
- Select the repository where the project is stored by one of the following methods and click the [Next] button.
- If you are using the configuration management repository for the first time in Next Design, or if the storage destination repository is not registered, register the repository by the following procedure.
- Select [Register a new Configuration Management Repository] and click the [Next] button.
- Enter the connection information to the configuration management repository and click the [Next] button.
- If the storage destination repository is already registered, select that repository and click the [Next] button.
- If you are using the configuration management repository for the first time in Next Design, or if the storage destination repository is not registered, register the repository by the following procedure.
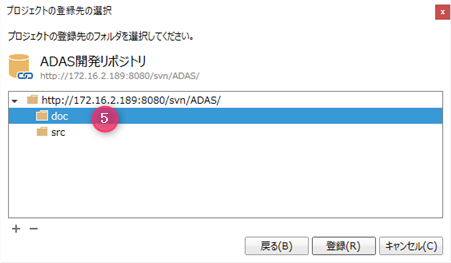
- Select the folder where you want to store the project folder and click Register.
- After successful repository registration, the Configuration Management Navigator will be available as a navigator choice.
Attention
- Be sure to register in the repository on Next Design.
- If you register in the repository using a Subversion client tool other than Next Design, the configuration management system linkage function of Next Design may not work properly.
- Immediately after registering in the repository, you are in the state where you have started editing the registered file set.
- If you do not want to edit after registering the repository, please cancel the editing authority.
Manage repositories to use
To register the Configuration Management Repository in Next Design and change the registered connection information, follow the steps below.
Operation procedure
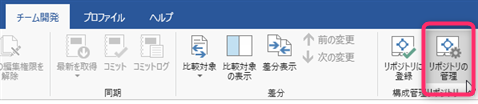
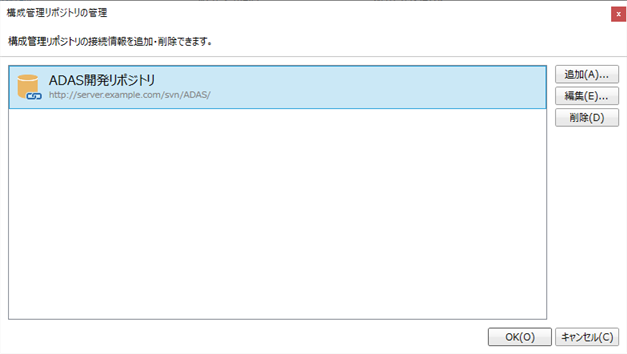
- Click Team Collaboration> SCM Repository> Repository Management from the ribbon to display the Repository Management dialog.
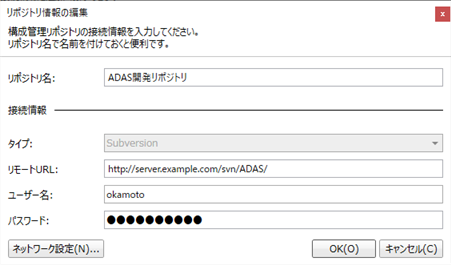
- To add a new repository, press the Add button, then enter the connection information to the repository in the Editing Repository Setting dialog and press the Add button.
- To change the connection information of the registered repository, select the registered repository, press the [Edit] button, and then edit the connection information to the repository in the [Editing Repository Setting] dialog. Click the [OK] button.
- To delete a registered repository, select the registered repository, click the [Delete] button, and click the [OK] button in the confirmation message.
- To confirm the above changes, click the [OK] button in the [Repository Management] dialog.