I want to constrain the models that can be associated
By defining reference associations between entities in the metamodel, you specify the types of models (metamodel classes) that can be associated as references. In that case, when you try to add the referenced model, all the models in the project are narrowed down and listed with the candidates that can be associated with the model type as a condition.
On the other hand, it is constrained to narrow down the candidates that can be associated from a specific range of models.
For example, consider the following metamodel structure:
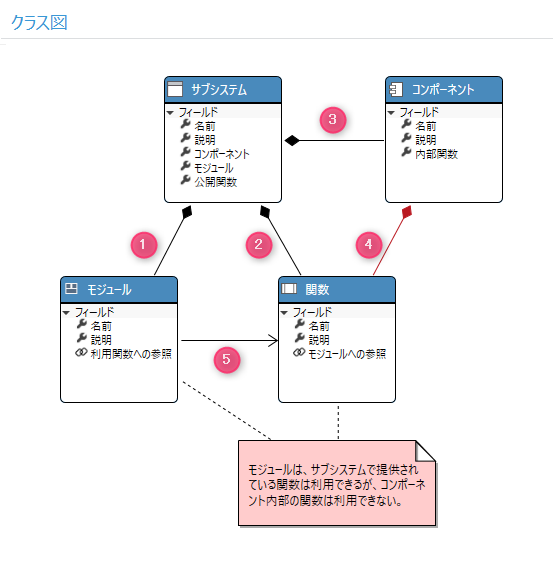
- Subsystems and components own functions. ・ ・ ・ (2) and (4) in the figure
- Modules use functions. ・ ・ ・ (5) in the figure
According to this metamodel structure, the candidate functions available in a module are both subsystem functions and component functions. On the other hand, suppose that the module has a design constraint that only the function of the subsystem ((2) in the figure) can be used, and the function of the component ((4) in the figure) cannot be used.
Next Design allows you to impose such constraints on reference associations ((5) in the figure).
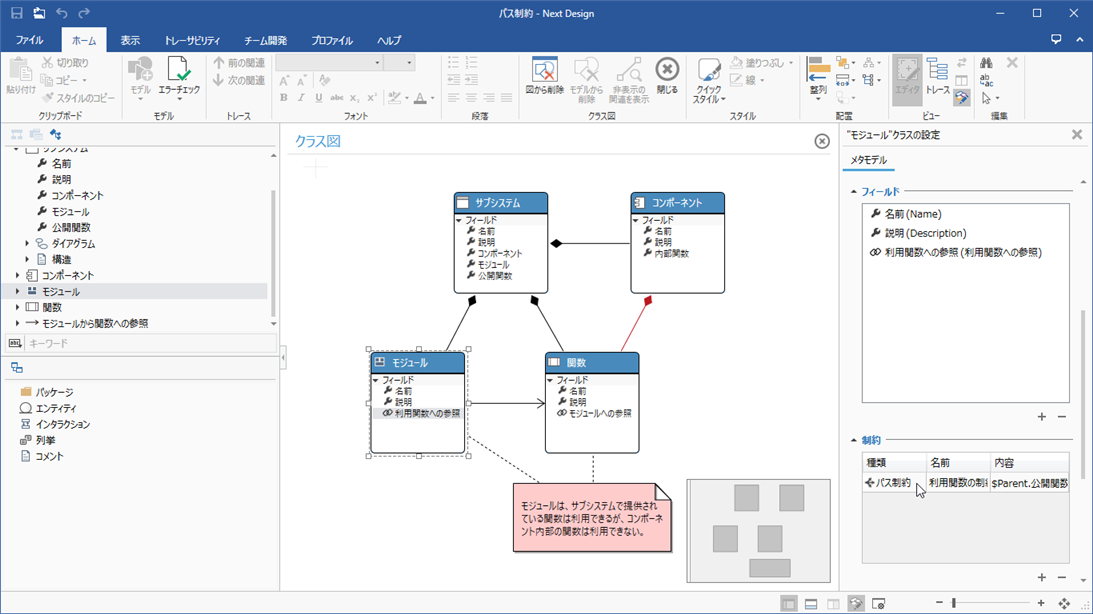
To constrain reference associations, add constraints to the reference associations defined in the metamodel. The constraint specifies the path from the referencing entity to the referenced entity that can be associated (hereinafter referred to as the path constraint) based on the metamodel structure. In the above example, specify the path (1)-(2) of the figure from the module of the reference source to the function of the reference destination as follows.
$ Parent. Public function
After applying a path constraint, verify that the path constraint works correctly and that there are no violations of the path constraint in the project. This allows you to detect and deal with constraint violations if you later add path constraints to an existing project or if you change path constraints.
The following describes path constraints for reference associations between entities in the following order:
- Add/change path constraints
- Edit the model according to the path constraint
- Validate path constraints
Add/change path constraints
To add a path constraint to the reference association between entities and change the added path constraint, follow these steps:
Operation procedure
- Select the entity that holds the field for which you want to add a path constraint in one of the following ways:
- In the Profile Navigator, display the class diagram that contains the entity and select the entity.
- Select the relevant entity in the profile navigator tree.
- Click View> Pane> Inspector from the ribbon to display the Inspector on the right and scroll down to see the Constraints list.
- To add a path constraint, click the + button at the bottom right of the Constraints list.
- Set the following items in the Add constraint dialog:
- Enter a name for the constraint in Display Name and Name.
- Under Kind, select Path Constraints.
- Under Target Field, select Reference to Utilization Function (Reference to Utilization Function).
- In Path, enter the path to allow the association, according to the path constraint notation.
- Click the [OK] button in the dialog to add the path constraint.
- To change the added path constraint, move the pointer over the constraint displayed in the Constraints list in the Inspector and click the edit icon.
- Change the settings in the [Constraint setting] dialog and click the [OK] button.
note
- If you add or change path constraints, the existing model will remain the same.
- To check if the existing model meets the path constraints, perform error checking according to "Verifying Path Constraints" below.
Path constraint notation
The format and elements of the path constraint are as follows:
Format: {path element}. {path element}. ・ ・ ・; {path element}. {path element}. ・ ・ ・
| {Path element} | Description |
|---|---|
| $ Parent | Parent Entity |
| Field Name | Field name corresponding to the path to the related destination |
| Special sign | Description |
|---|---|
| . (Period) | Symbol that connects the elements of the path |
| ; (semicolon) | Delimiter for writing multiple path constraints side by side with or condition |
Edit the model according to the path constraint
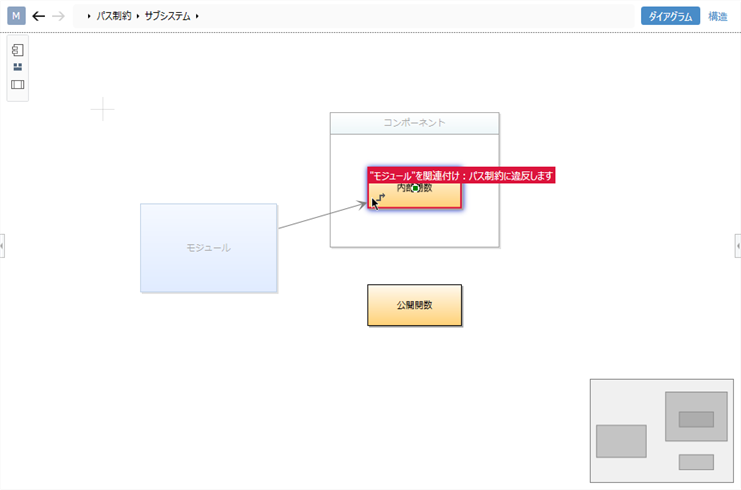
If you try to associate a model that does not meet the path constraint on the ER diagram with the path constraint added, an error will be displayed and the association will not be possible.
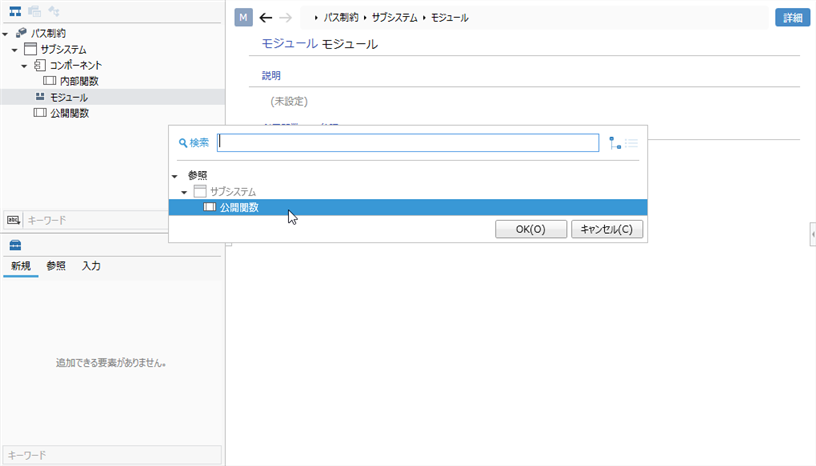
Then, when you try to add a referenced model in a form etc., only model candidates that satisfy the path constraint are listed.
Validate path constraints
To check for violations of path constraints in your project, do the following:
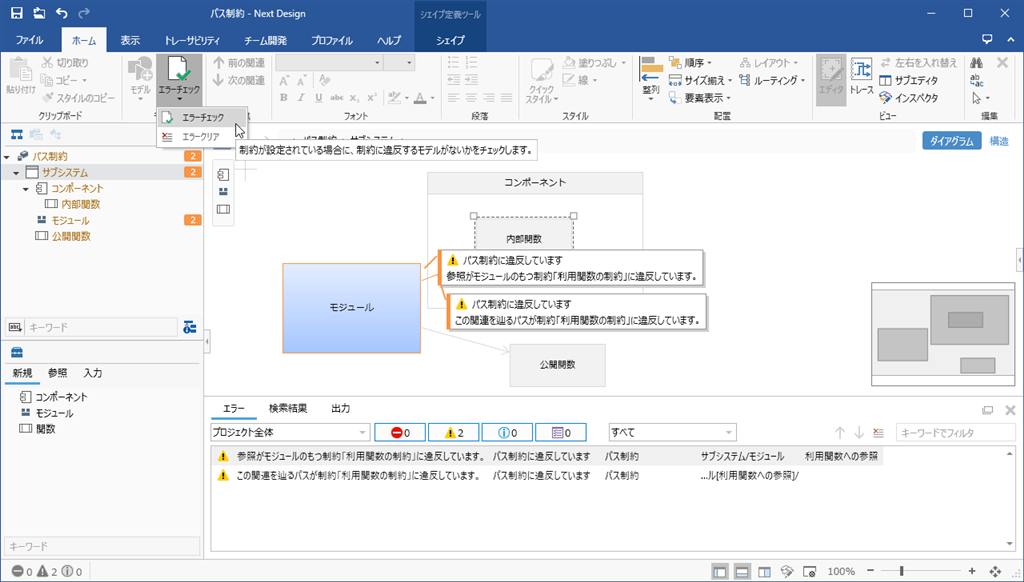
Operation procedure
- Click Home> Model> Check Error from the ribbon, and any violations of the path constraint will be displayed in the error list.
- To jump to the error location, double-click the error displayed in the error list.
- To clear the error list, do one of the following:
- From the ribbon, click [▼] at the bottom of [Home]> [Model]> [Check Error], and then click [Clear Error].
- Click the [Clear Error Details] button on the error list toolbar.