Create a model based on the profile
Overview
Next Design allows you to intuitively create models of various expression formats used for software development.
In the following, let's create a use case model by following the steps below.
- Create a new project
- Added use case model
- Create actors and use cases and edit descriptions
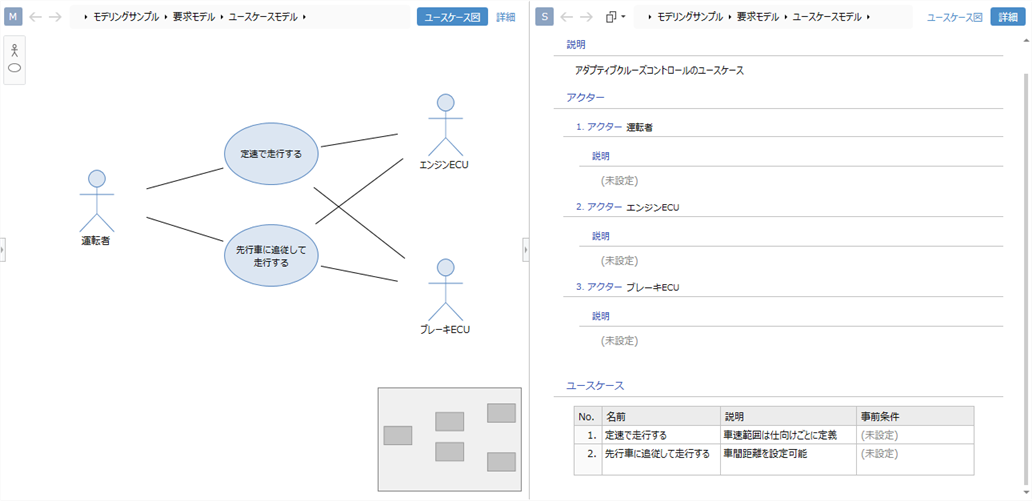
Image of model to be created
Advance preparation
Understand the screen configuration
The Next Design user interface is divided into the upper part, left side, and right side, centered on the central editing area.
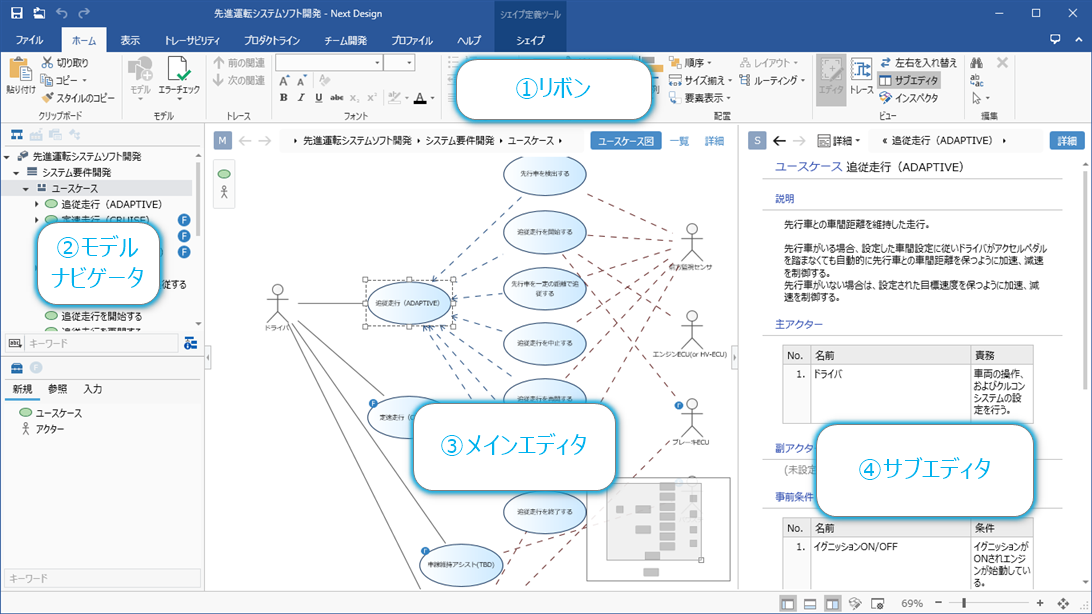
Ribbon that displays menus and commands at the top, Explorer-like tree-structured navigator on the left, Main editing area in the center, On the right is a sub-editing area that is also a feature of Next Design.
| Areas | Main uses |
|---|---|
| (1) Ribbon | Menus used for editing operations are displayed. You can switch between them using the tabs at the top of the ribbon. |
| (2) Model Navigator | The model structure being edited is displayed in a tree. You can switch the navigator according to the purpose with the selector at the top. |
| (3) Main Editor | You can edit the model selected in the navigator. You can switch the display format of the model with the button on the upper right. |
| (4) Sub-Editor | Related models can be edited side by side in a two-screen display. |
Download
Download and unzip the zip file containing the sample profile from the following link.
Download link: quickstart.zip
Create a new project
When creating a new project, it is necessary to specify a profile according to the design target.
Here, create a new project using the following sample profile.
Profile to use: Quick Start/Modeling/Profile Definition Sample.iprof
Start Next Design and create a new project from the start page by following the steps below.
Operation procedure
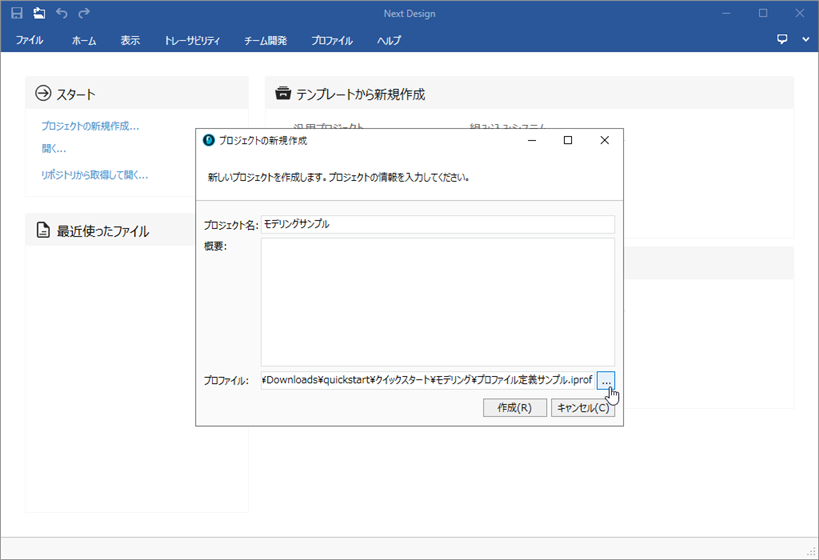
- Click the Start> Create New Project link to display the Create New Project dialog.
- Enter the Project Name, click the profile's [...] button, and specify the profile (.iprof file) you want to use.
- Click the [Create] button to create a new project.
Added use case model
Immediately after creating a new project in Next Design, only the project is displayed at the beginning of the model navigator. To start editing a model, you need to add the model you want to edit under the project.
Here, add the following [Use Case Model] for editing to the newly created project.
Model to be edited: [Modeling sample]> [Requirement model]> [Use case model]
Operation procedure
- Right-click on the project displayed at the top of the model navigator and click on it. Click Add Model> Request Model from the context menu Add a first level model.
- Right-click on the added Request Model Click Add Model> Use Case Model from the context menu Add the model to be edited.
- When you add a model in the Model Navigator, the model is displayed in the main editor and ready for editing.
Create and edit actors and use cases
Next Design allows you to directly edit the same model while viewing it in various forms of expression.
For example, when you start modeling, you can edit the model in a schematic diagram format so that you can understand the overall structure of the model. After that, you can add the details of the model by switching to the form format that expresses the model in a list or document.
1. Add actors and use cases
To add model components to your diagram, do the following:
Operation procedure
- Select the type of model you want to add from the toolbox under the model navigator and drag and drop it onto the diagram.
Other operating procedures
- You can also drag and drop from the sub toolbox on the far left of the editor editing area.
Operation procedure
When entering the name of the model, do one of the following:
- Start keying with the model selected
- Double-click on the model
- Select a model and press the f2 key
2. Associate actors with use cases
To associate model components in a diagram, do the following:
Operation procedure
- Move the pointer over a component of the model.
- Drag the [▲] icon displayed in four directions and drop it on the model you want to associate.
- If there are multiple related types, the choices will pop up after the drop, so click to select.
Attention
- You cannot add associations between models for which associations are not allowed.
- Whether or not the association is possible is determined by the type of model to be associated.
3. Edit actor and use case details
To switch the representation of the model and edit the details of the model, follow these steps:
Operation procedure
- Click the view choices displayed in the upper right corner of the editing area to switch between views. (In the above example, there are two views, [Usecase Diagram] and [Detail]).
- Switch from the view choices to the Detail view and fill in the document form-style view.
- To edit text, such as a description, do one of the following, similar to entering a name in a diagram:
- Start key input with the input location selected
- Double-click the input location
- Select the input location and press the f2 key.
- Enter shift + enter to start a new line in the middle of the text.
note
- Switchable views vary from entity to entity.