ExtensionPoints ライブラリを使う
DLLで開発する場合、拡張ポイントの定義については、NextDesign.ExtensionPointsライブラリを用いると非常にシンプルに記載できるようになります。
- Next Designのエクステンションの拡張ポイントをコードで作成できます。
- コマンド、イベントクラスで分離できます。
- エクステンションのベースクラスがありシンプルに実装できます。
インストール方法
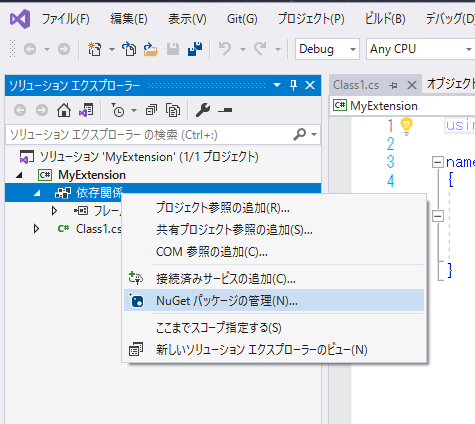
次のDLLをNuGetパッケージで取得します。Visual Studioのソリューションエクスプローラからプロジェクトの[依存関係]を選択し、コンテキストメニューから[NuGetパッケージの管理]を実行します。

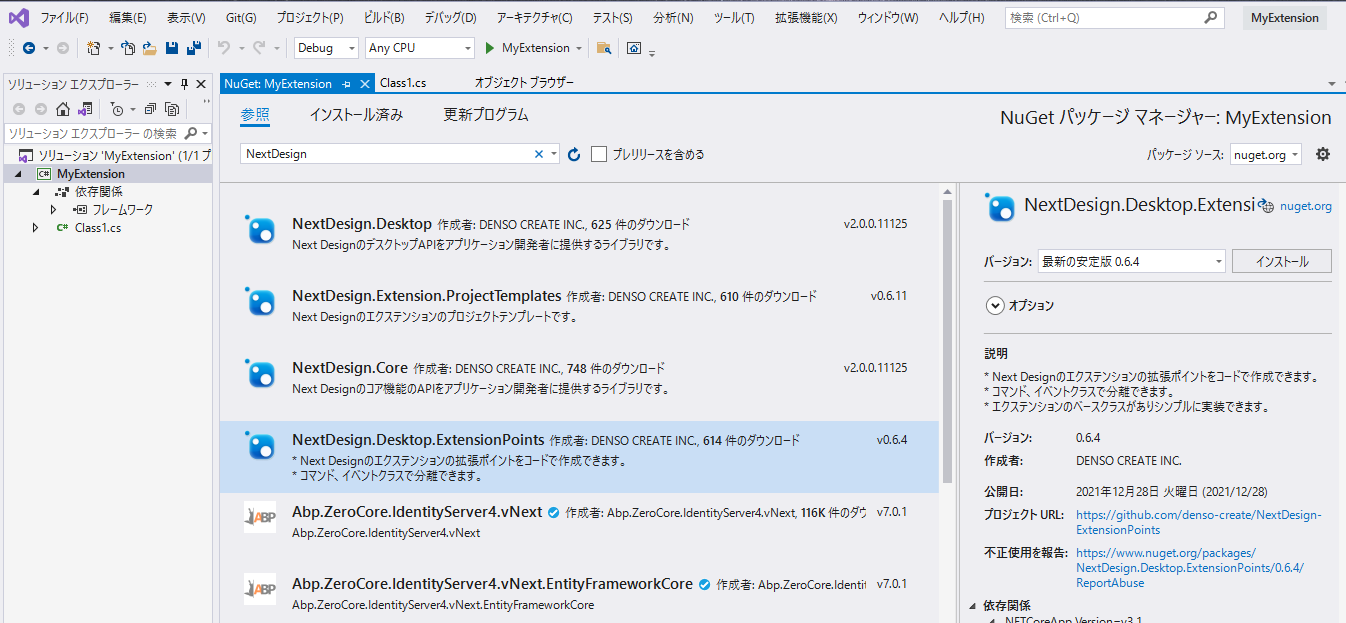
パッケージソースをnuget.orgになっていることを確認し、[参照]タブでNextDesignと入力して検索するとNextDesign.Desktop.ExtensionPointsのパッケージが表示されるのでインストールします。

なお、コマンドラインでプロジェクトのディレクトリに移動し、次のコマンドを実行することでインストールすることもできます。
C:\Projects\MyExtension> NuGet Install NextDesign.Desktop.ExtensionPoints
拡張ポイントの定義
マニフェストの定義
- 次のように非常にシンプルになります。
manifest.json
{
    "name": "SampleExtension",
    "main": "SampleExtension.dll",
    "lifecycle": "application"
}
エクステンションの実装
コードでマニフェストを作成できます。
SampleExtension.cs
using NextDesign.Desktop.ExtensionPoints;

namespace SampleExtension
{
    /// <summary>
    /// エクステンションのエントリポイントです
    /// </summary>
    public class SampleExtensionEntryPoint : ExtensionBase
    {
        #region Activate/Deactivate

        /// <summary>
        /// アクティベート時の処理です。
        /// </summary>
        protected override void OnActivate()
        {
            // リボン
            ExtensionPoints.Ribbon.AddTab("SampleExPoint").AddGroup("Test1").AddLargeButton<HelloCommand>("こんにちは");

            // イベント
            ExtensionPoints.Events.Application.RegisterOnAfterStart<ApplicationAfterStart>();
        }

        /// <summary>
        /// ディアクティベート時の処理です。
        /// </summary>
        protected override void OnDeactivate()
        {
        }

        #endregion
    }
}
コマンドの処理も別のクラスになるため保守性が高くなります。
HelloCommand.cs
using NextDesign.Desktop;
using NextDesign.Desktop.ExtensionPoints;

namespace SampleExtension.Commands
{
    /// <summary>
    /// Hello コマンドの実装です。
    /// </summary>
    public class HelloCommand : CommandHandlerBase
    {
        /// <summary>
        /// コマンドの実行
        /// </summary>
        /// <param name="c"></param>
        /// <param name="p"></param>
        protected override void OnExecute(ICommandContext c, ICommandParams p)
        {
            if ( CurrentProject != null)
            {
                Output.WriteLine(ExtensionName, $"ProjectName : {CurrentProject.Name}");
            } else
            {
                Output.WriteLine(ExtensionName,$"Project is not opened");
            }

            // アクティブにします
            App.Window.IsInformationPaneVisible = true;
            App.Window.CurrentOutputCategory = ExtensionName;
            App.Window.ActiveInfoWindow = "Output";
        }
    }
}
イベントも固有クラスになり、またパラメータも型が指定されるため実装がシンプルです。
ApplicationAfterStart.cs
using NextDesign.Desktop;
using NextDesign.Desktop.ExtensionPoints;

namespace SampleExtension.Events
{
    /// <summary>
    /// アプリケーション実行イベント
    /// </summary>
    internal class ApplicationAfterStart : ApplicationAfterStartEventHandlerBase
    {
        /// <summary>
        /// イベントハンドラの処理です。
        /// </summary>
        /// <param name="c"></param>
        /// <param name="p"></param>
        protected override void OnHandle(IEventContext c, AfterStartEventParams p)
        {
            // イベント処理を実装します。
            Output.WriteLine(ExtensionName, $"Events: ApplicationAfterStart Event. Version: {App.Version}");
        }
    }
}
リファレンス
詳細はExtensionPointsを参照して下さい。