Entity field definition
Overview
Next Design allows you to define fields for each entity.
Fields are the individual input fields for your model. When applied to object-oriented design, the attributes of a class correspond to the fields of an entity. You can define multiple fields for each entity that is the model template.
The following steps describe how to define a field for an entity in the following order:
- Field data type
- Add a field
- Delete the field
- Edit field settings
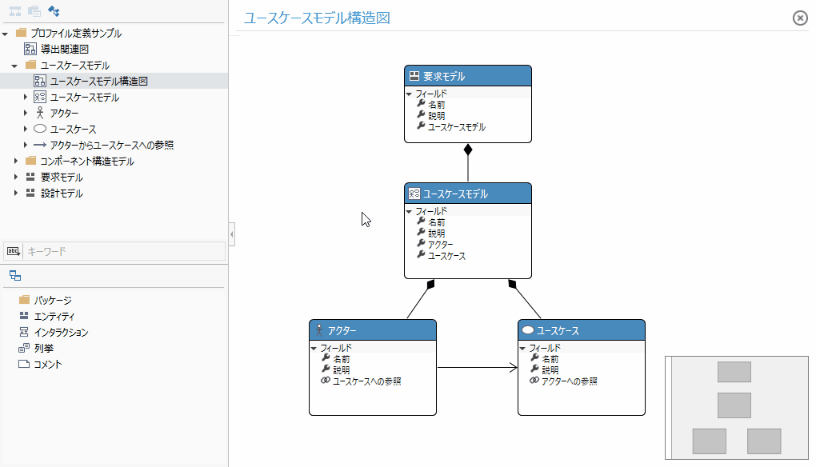
Image of field definition
Field data type
The available data types for the fields of an entity are:
| Data Type | Description |
|---|---|
| String | You can enter text characters Maximum size: 2GB |
| Integer | You can enter positive and negative integers Range: -2,147,483,648 ~ 2,147,483,647 |
| Real numbers | Positive and negative real numbers can be entered Approximate range: -1.7E + 308 ~ 1.7E + 308 |
| Boolean value | You can enter the boolean value (checked/unchecked) |
| Richtext | You can enter content including formatted text, tables, images, hyperlinks, etc. |
| Enum Type | You can enter the value of the specified enumeration |
| Class | Can hold multiple related models |
note
- The data type of a field cannot be changed after adding a field.
Add a field
There are several ways to add a field to an entity:
- Add fields in the class diagram
- Add a field in the profile navigator
- Add fields in the Inspector
- Add new fields while modeling in document form
Add fields in the class diagram
To add a field to an entity using a class diagram, do the following:
Operation procedure
- Move the pointer to the field display area of the entity and click the [+] icon that appears in the upper right corner of the field display area.
- Click to display the Add New Fields dialog. Enter the settings and specify the [Data Type].
- If you want to specify a default type such as [String] as the data type
- Select a data type from the choices.
- When specifying an existing entity as the data type
- Click the [...] button on the far right of [Data Type].
- Click to open the Finder to search for entities.
- Find and click on an entity from the list on the Finder and the Data Type will be populated with that entity.
- Select the additional items Multiplicity and Field Type from the choices.
- Enter other setting items, and then click the [OK] button.
- This will make the added field appear in the list of fields that the entity has.
For details on the setting items for fields, see "Editing field settings" below.
Add a field in the profile navigator
To add a field to an entity using the Profile Navigator, do the following:
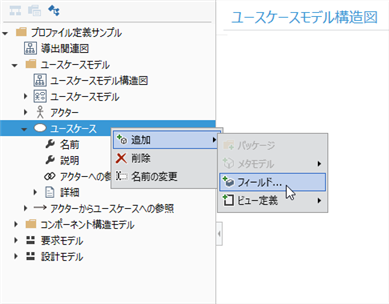
Operation procedure
- In the profile navigator tree, select the entity to which you want to add the field.
- Do one of the following to display the Add New Fields dialog.
- Right-click the selected entity and click Add> Filelds from the context menu.
- From the ribbon, click Profile> Metamodel> Filelds.
- The input in the [Add New Fields] dialog is the same as "Adding fields in the class diagram" above.
- After entering the setting items and clicking the [OK] button, the added field will be displayed directly under the entity.
Add a field in the Inspector
To add a field to an entity using the Inspector, do the following:
Operation procedure
- In the class diagram or profile navigator, select the entity to which you want to add the field.
- Select Metamodel in the tab at the top of the Inspector.
- Click the + icon in the lower right corner of the list of fields in the Filelds group in the Inspector to display the Add New Fields dialog.
- The input in the [Add New Fields] dialog is the same as "Adding fields in the class diagram" above.
- After entering the setting items and clicking the [OK] button, the added field will be added to the field list.
You can add fields by following the above procedure even when the Inspector is displayed during modeling.
Add new fields while modeling in document form
To add a new field while modeling in a document form, do the following:
Operation procedure
- Display the document form in the Model Editor and select the model (or the field of that model) to which you want to add the field.
- Do one of the following to display the Add New Fields dialog.
- Right-click on the selected model and click Add New Field from the context menu
- Click Profile> Metamodel> Filelds from the ribbon
- Click Profile> Form> Add New Fields from the ribbon
- Click Form> Form> Add New Fields from the ribbon
- The input in the [Add New Fields] dialog is the same as "Adding fields in the class diagram" above.
- After entering the setting items and clicking the [OK] button, the added field will be added to the metamodel and at the same time to the document form.
Delete the field
There are several ways to remove a field from an entity:
- Delete the field in the class diagram
- Delete a field in the profile navigator
- Delete the field in the Inspector
Delete fields in the class diagram
To remove a field from an entity using a class diagram, do the following:
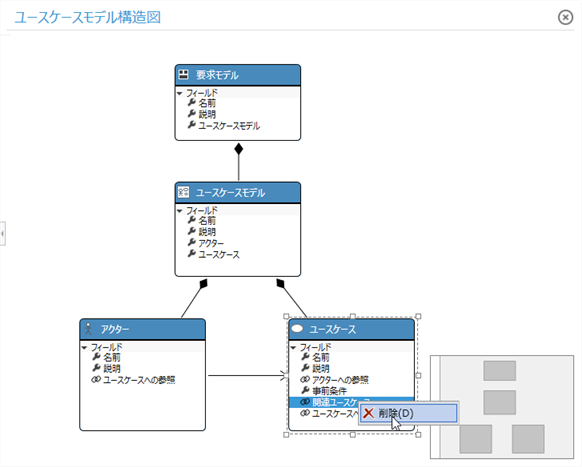
Operation procedure
- Select the target field in the class diagram and execute [Delete] from the context menu, or press the delete key.
Delete a field in the profile navigator
To delete an entity's field using the Profile Navigator, do the following:
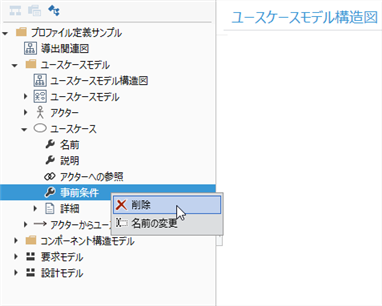
Operation procedure
- Select the target field and execute [Delete] from the context menu, or press the delete key.
Delete a field in the Inspector
To remove an entity's field using the Inspector, do the following:
Operation procedure
- Select Metamodel in the tab at the top of the Inspector.
- Select the target field from the field list and click the [-] icon displayed at the bottom right of the field list.
You can also delete a field in the Inspector by following these steps:
Other operating procedures
- Display the Inspector when modeling and select Metamodel from the tabs at the top of the Inspector.
- Remove the field from the field list as in the previous step.
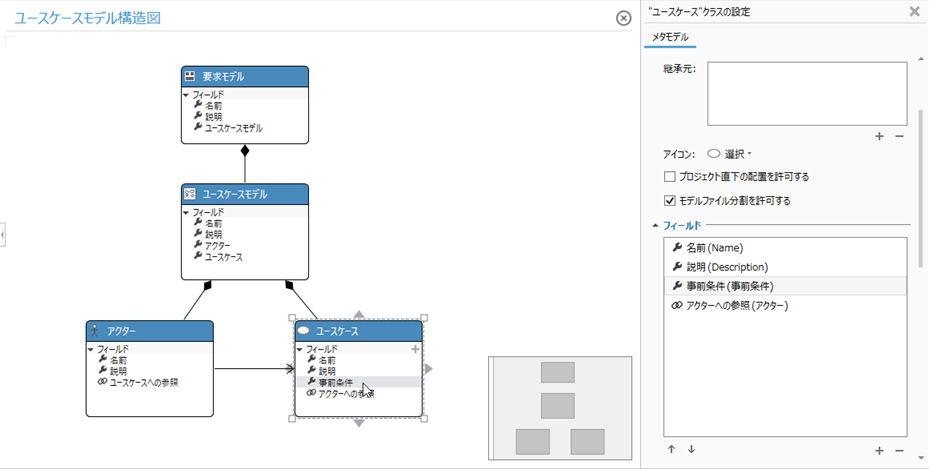
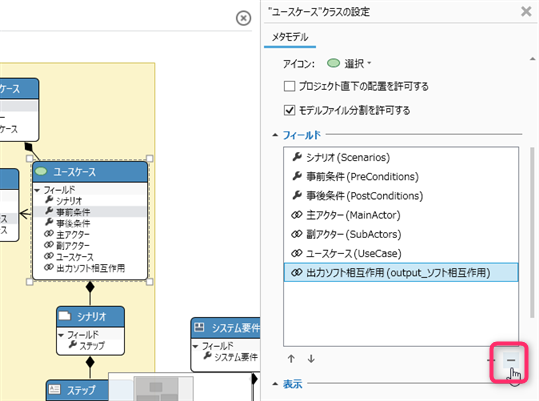
Edit field settings
To edit the settings of an existing field, use the Inspector as follows:
! Edit Field Settings (./images/edit-field-settings.gif)
Operation procedure
- Click View> Pane> Inspector from the ribbon to display the Inspector.
- Do one of the following to select the entity (or model) that has the target field.
- Select an entity in the Profile Navigator.
- Select an entity in the class diagram.
- Select a model in the model navigator.
- Select a model in the model editor.
- Make sure Metamodel is selected in the tabs at the top of the Inspector, or click to select it.
- Move the pointer over the target field in the field list of the Filelds group in the Inspector and click the edit icon that appears on the far right to display the Field Settings dialog.
- Change the settings in the [Field Settings] dialog and click the [OK] button for the changes to take effect.
reference
- For more information on field settings, see Reference> Profile Settings and Modeling Changes.